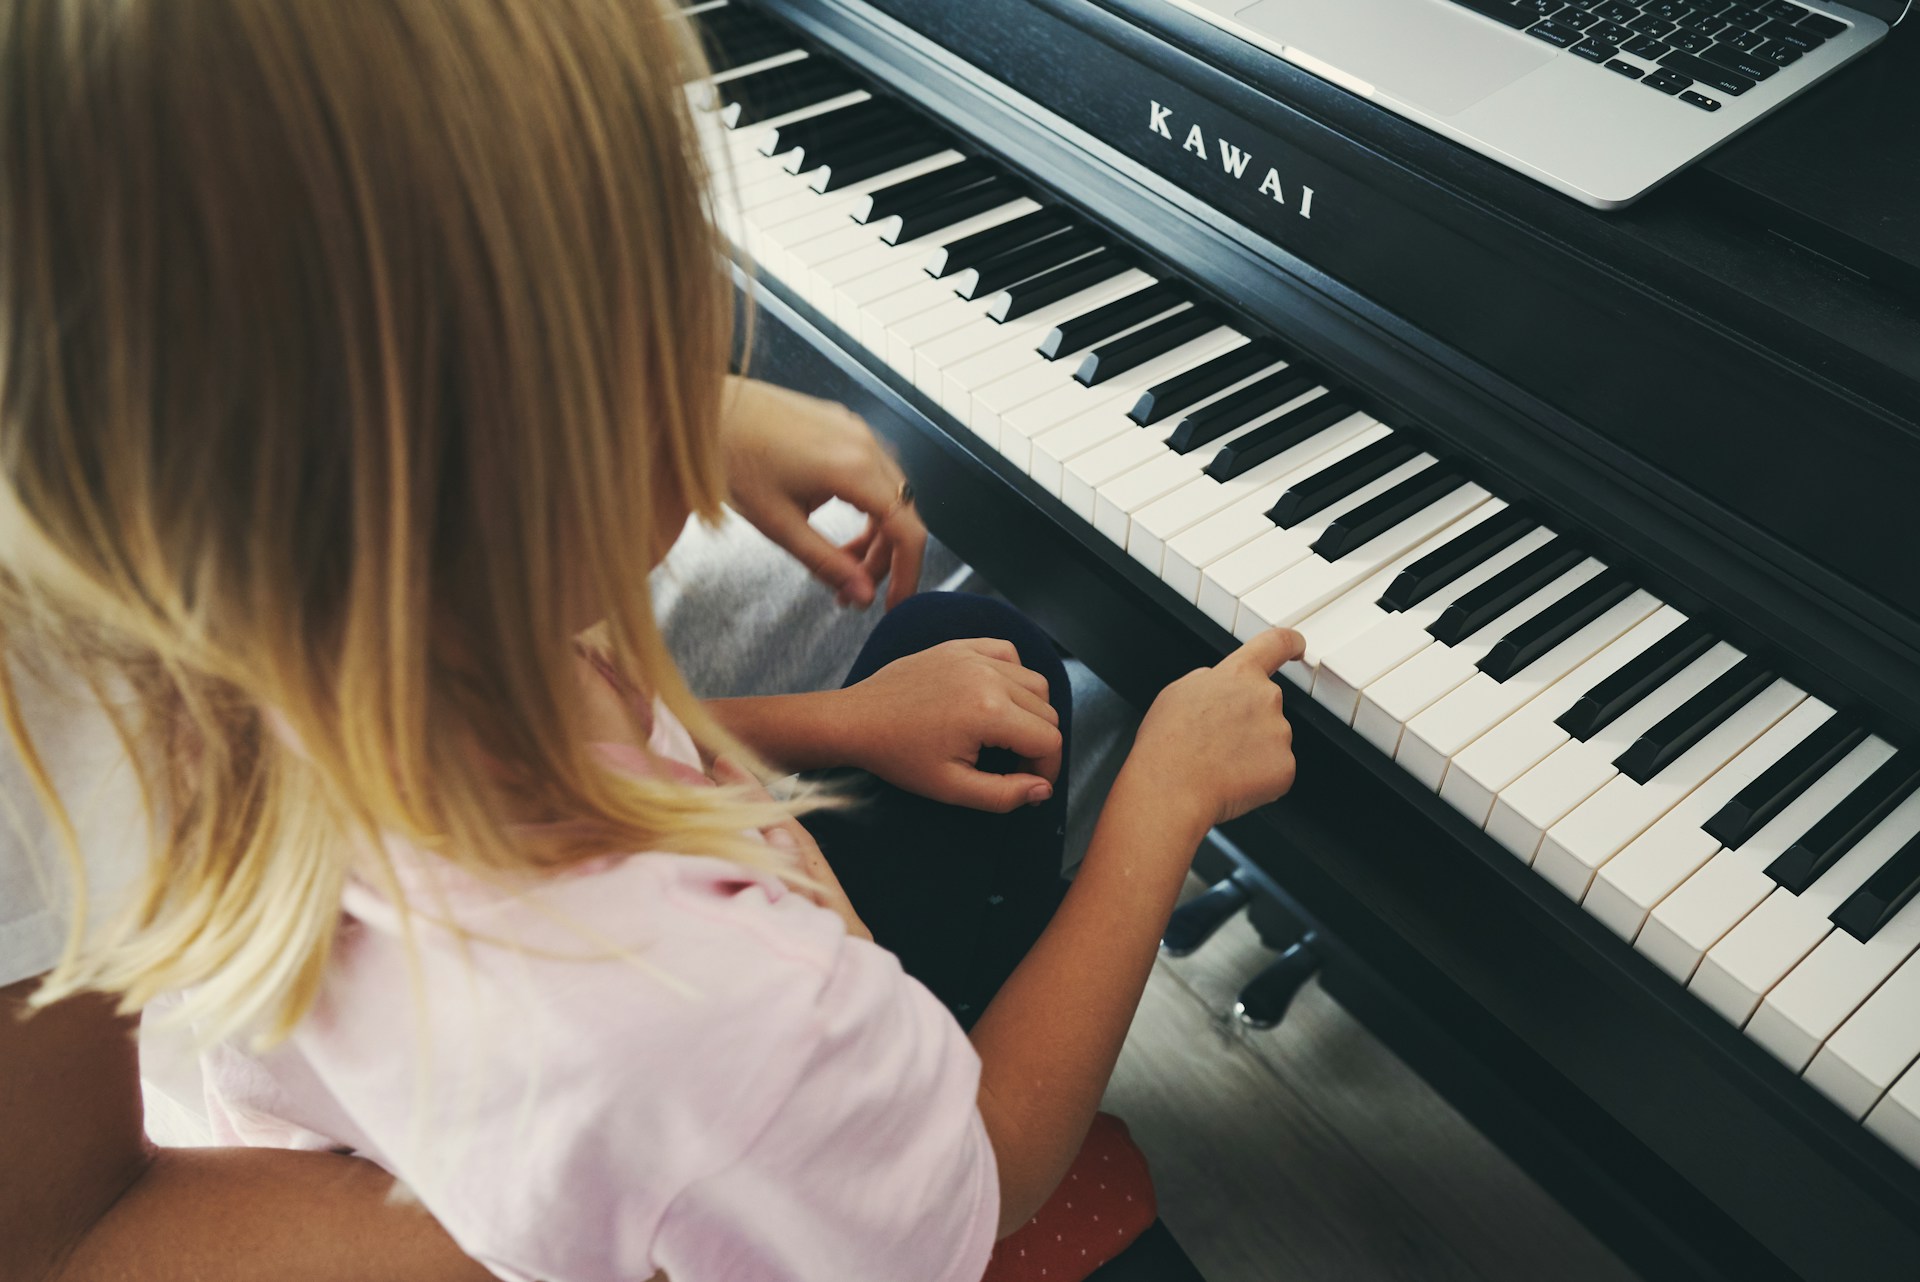
Creative Piano Exercises - Build Technique Musically
A lot of piano practice goes stale for the same reason: the hands are moving, but the ears and imagination have checked out.
A player sits down with good intentions, repeats a pattern again and again, and gets up feeling more obedient than musical.
The answer is not to abandon exercises. It is to make them musical enough to matter. When a practice pattern trains one clear skill and one musical variable at the same time, it stops feeling like punishment and starts sounding like piano playing.
Key Takeaways
- Creative piano exercisesbuild technique through rhythm, dynamics, harmony, listening, and improvisation.
- The best exercise keeps one technical target and adds one musical variable.
- Beginners usually improve fastest with five-finger patterns, left-hand grooves, call-and-response, and one-chord improvisation.
- If practice feels dull, change rhythm, touch, dynamics, direction, or harmony before you add speed.
- The right exercise is the one that matches your biggest bottleneck: finger control, coordination, rhythm, ear, or confidence.
Why Most Piano Exercises Feel Boring - And How To Make Them Musical
This section gives you the operating principle behind the whole article. Once it clicks, you can turn almost any plain drill into something that builds technique and musicianship at the same time.
The Difference Between A Mechanical Drill And A Creative Exercise
A mechanical drill asks your fingers to repeat a motion. A creative exercise asks your fingers to solve a musical problem.
That difference matters. Research on variable practice suggests that carefully changing related material can improve transfer better than repeating one fixed task in exactly the same way every time.
In a Frontiers study on variability of practice in music, pianistswho practiced a range of related intervals handled a new transfer task better than players who only repeated the fixed target.
The point is not to make practice random. It is to make practice attentive.
The One-rule Method: One Technical Target, One Musical Variable
Keep one technical target steady. That target might be even finger control, left-hand stability, scale fingering, chord changes, or rhythm accuracy. Then change one musical variable: rhythm, dynamics, articulation, register, harmony, or phrasing.
A plain C-major five-finger pattern becomes creative the moment you keep the fingering the same but change the rhythm from straight quavers to long-short, then soften the touch, then accent beat two, then switch to legato in one hand and staccato in the other. The notes have not changed. The listening has.
Progression rules that keep creative exercises effective
- Start at a tempo where every note is clean and relaxed.
- Repeat 3 clean reps before changing rhythm, dynamics, or speed.
- Raise the tempo by 3 to 5 BPM only if timing and tone stay even.
- If both hands lock up, go hands separate for one pass, then reconnect.
- If the sound gets harsh or rushed, reduce the tempo before adding difficulty.
That small framework makes practice feel purposeful instead of repetitive.
Why This Works For Beginners, Adult Learners, And Early Intermediates
A beginner needs simplicity, not monotony. An adult learner usually needs a reason for every task. An early intermediate player needs a bridge between “I can play the notes” and “I can shape the sound.”
That is why creativity helps. ABRSM’s guidance on improvisationargues that experimenting and exploring ideas should be part of everyday musical life, while Monash research on practice, motivation, and self-regulationconnects productive practice with emotion, motivation, and self-management rather than pure repetition.
When practice sounds more like music, you are more likely to stay with it long enough to improve. That makes a short musical warm-up the best place to begin.
Start With A 5-Minute Musical Warm-Up
A good warm-up should wake up your touch, timing, and attention without draining you. The goal is not speed. The goal is to arrive at the keyboard ready to listen.
Relaxation, Posture, And Tone Before Speed
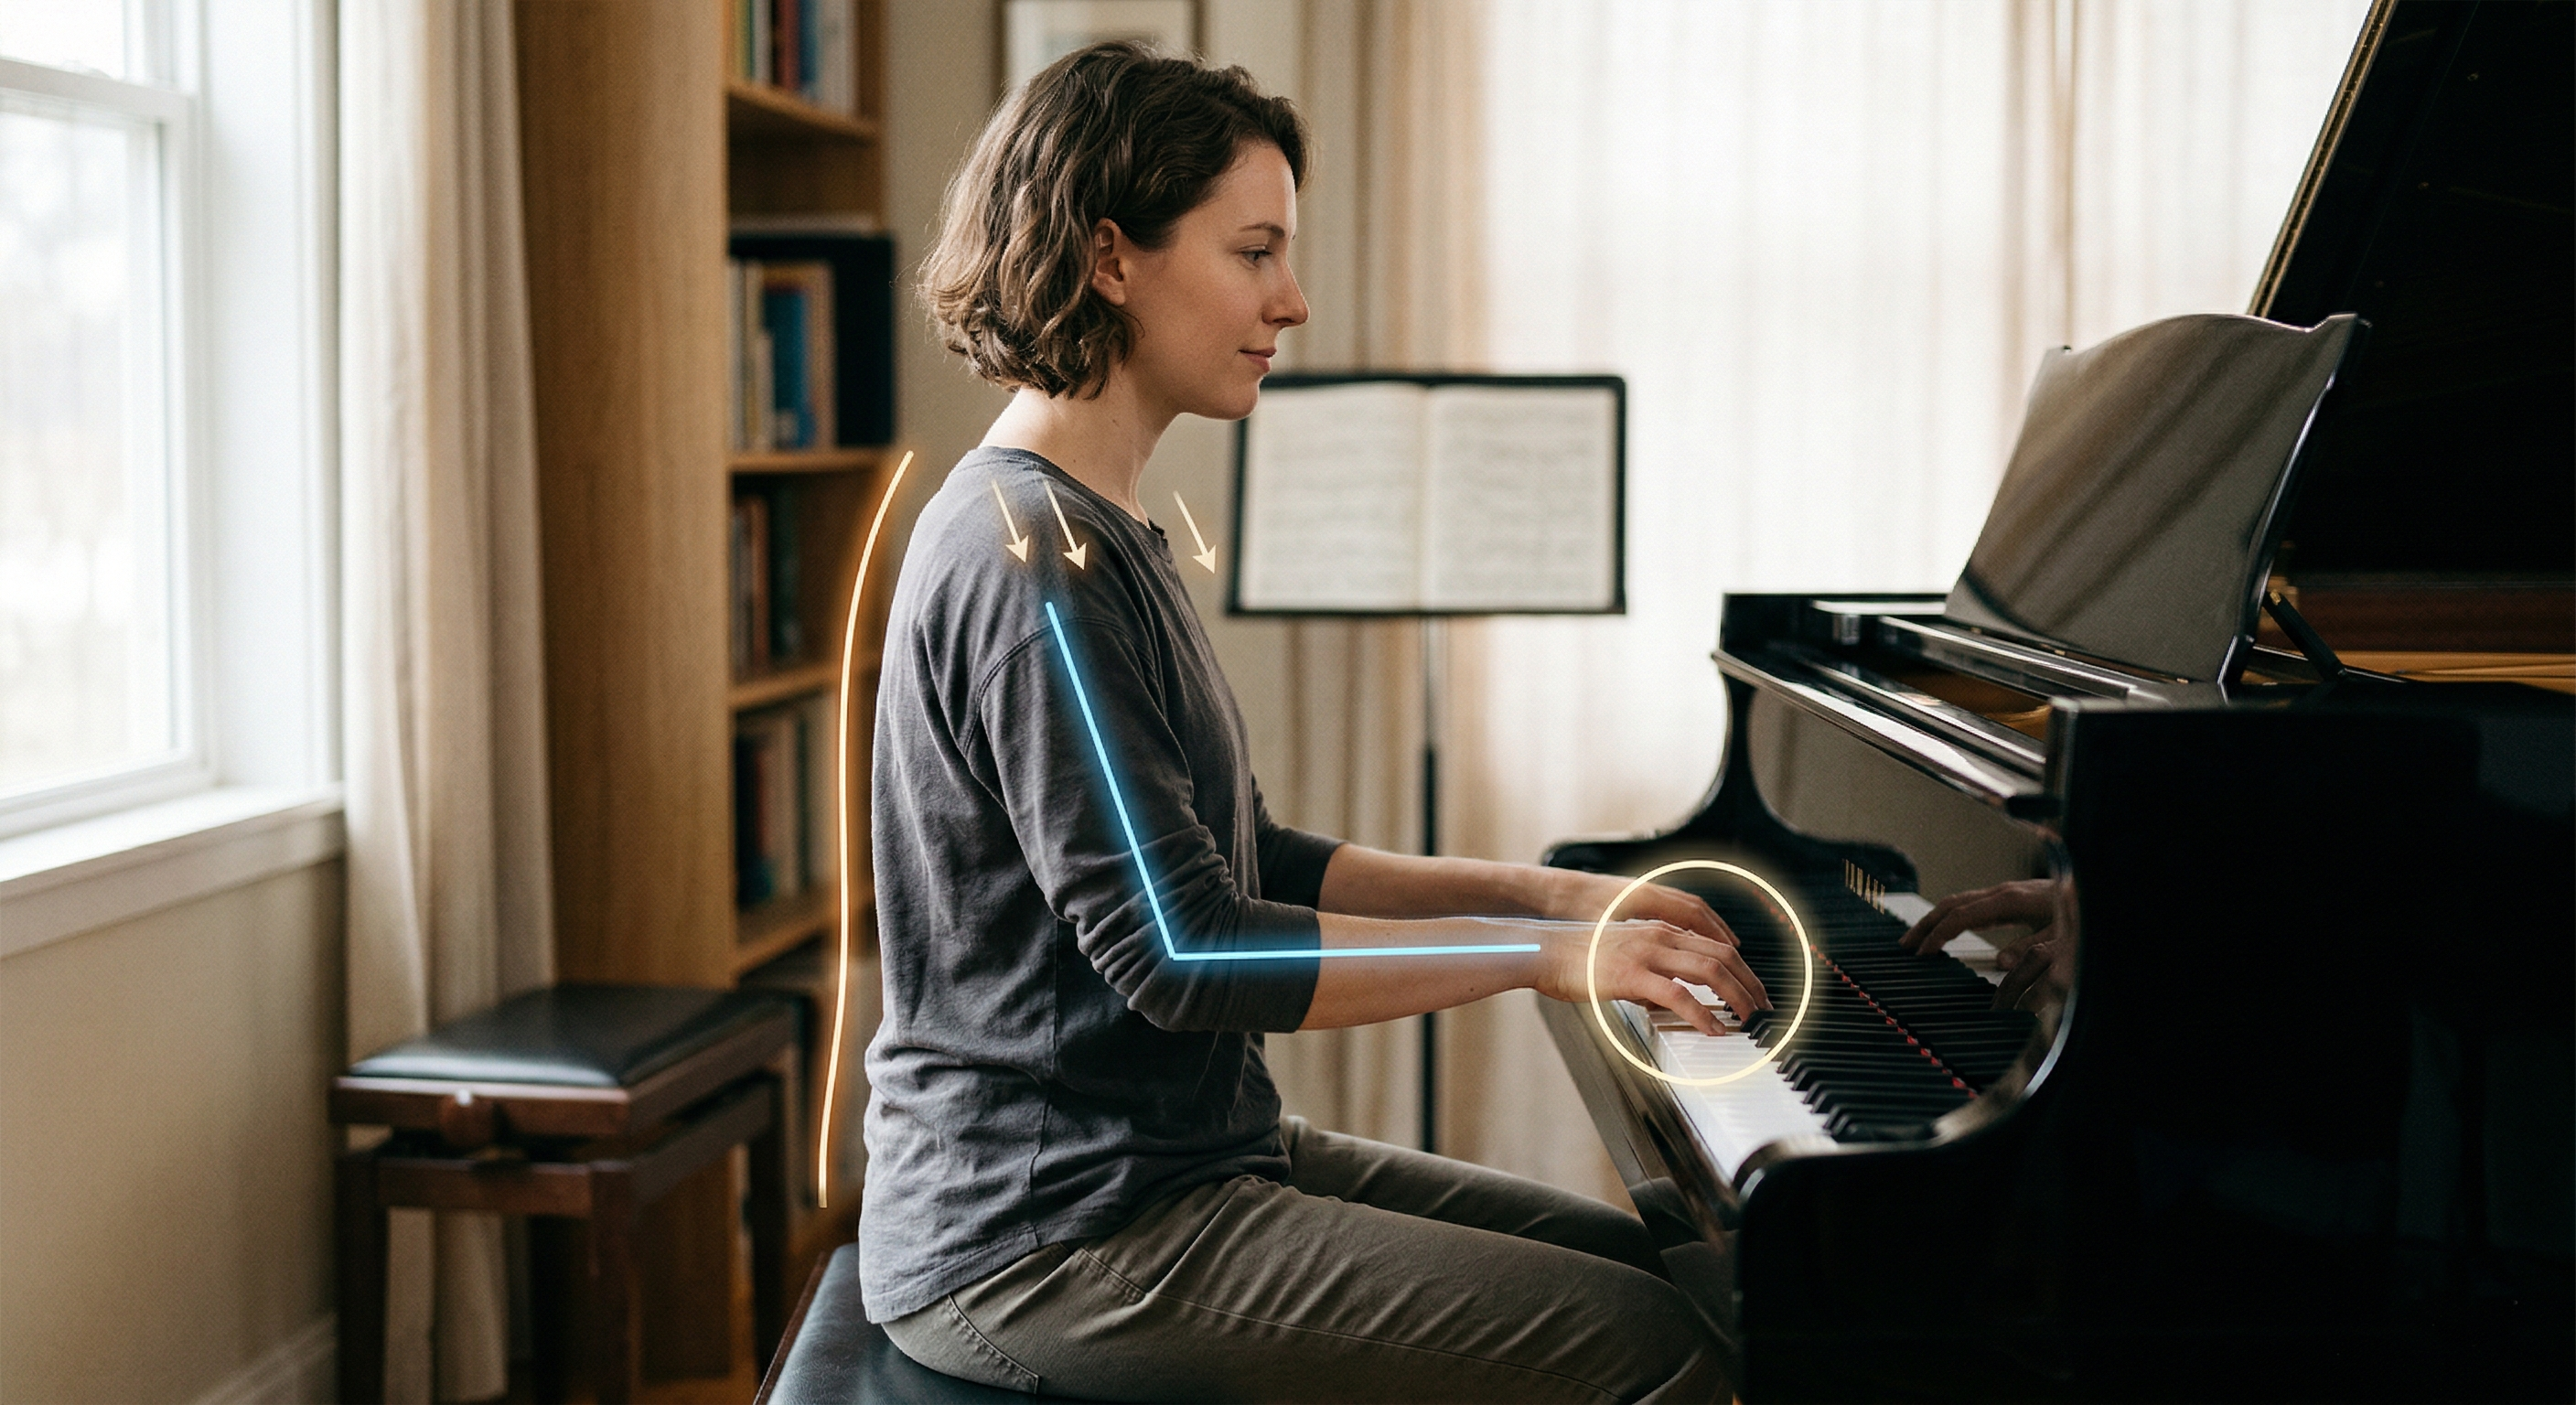
Picture a returning adult player who starts cold and immediately chases fast scales. The wrists tighten, the shoulders creep upward, and by minute three the tone is already harsh.
Start differently. Let the hands settle on five notes. Play slowly enough to hear whether each note matches the others in weight and length.
A recent Frontiers review on piano biomechanics and pedagogyemphasizes movement efficiency and technique awareness, which is another reason to put relaxed control ahead of force.
A warm-up should tell your body that the session will be attentive, not rushed.
A Five-finger Pattern With Rhythm Changes
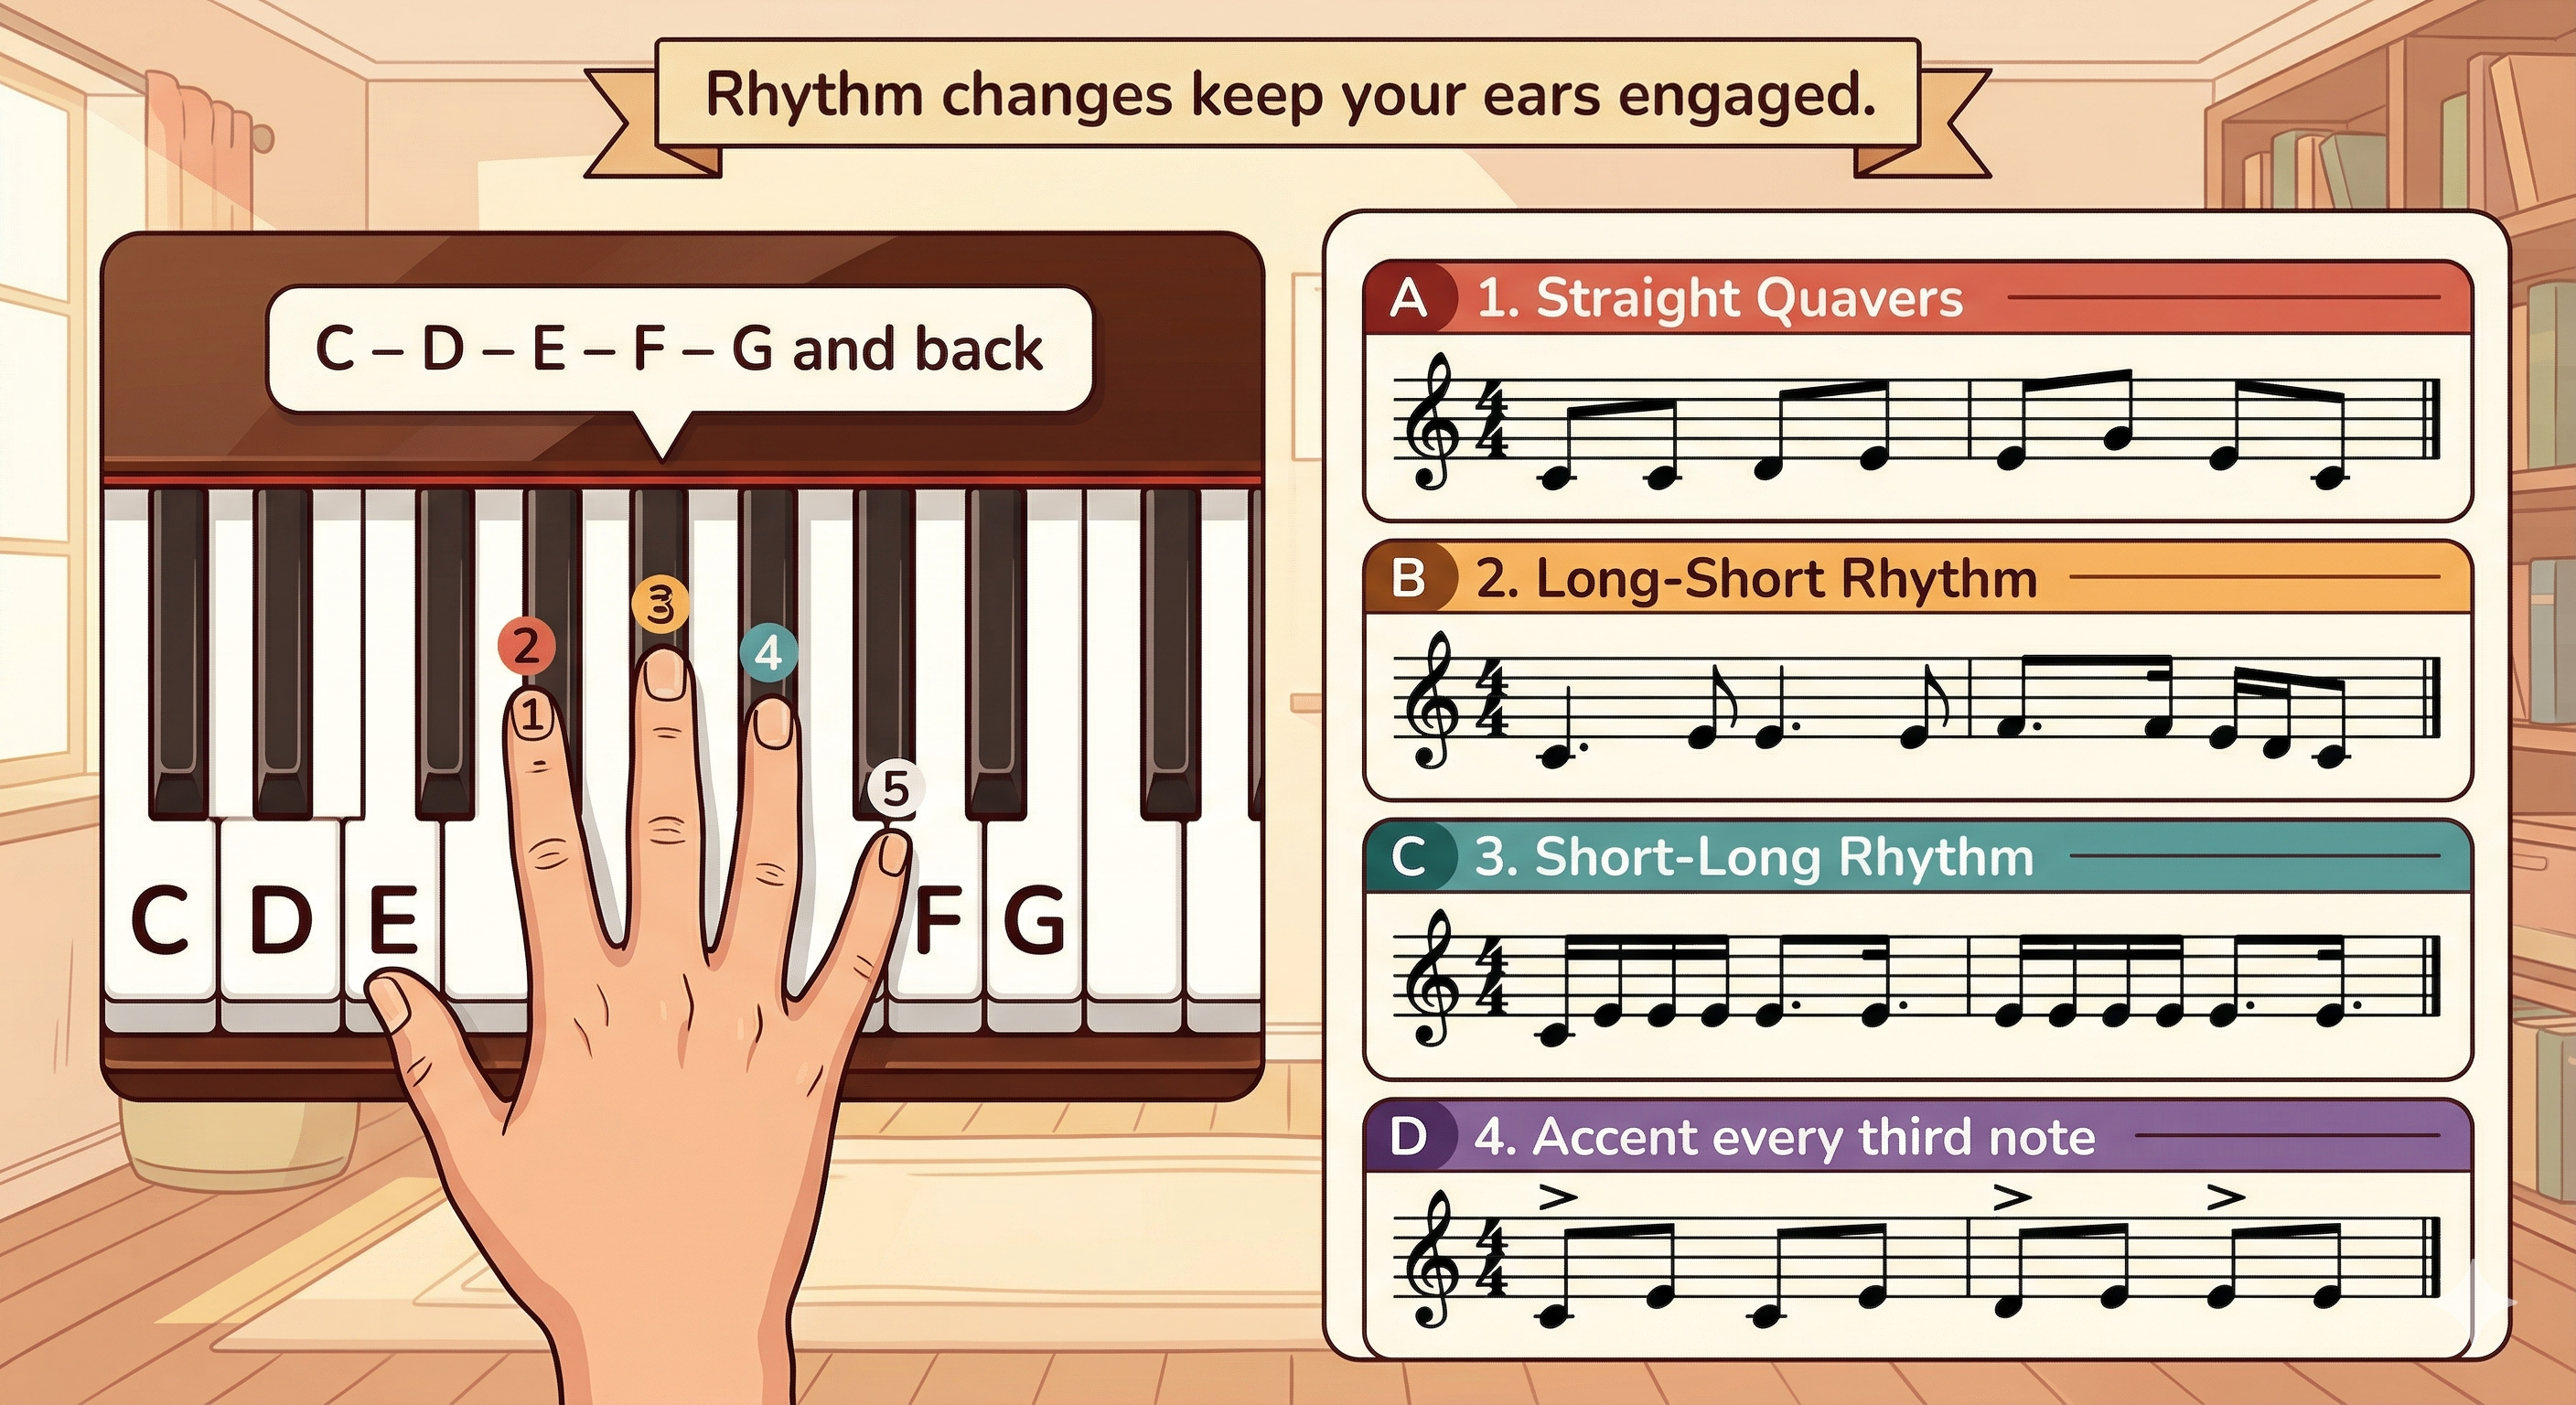
Play C–D–E–F–G in the right hand and then come back down.
Here is the simplest visual version:
| Finger | Note |
| 1 | C |
| 2 | D |
| 3 | E |
| 4 | F |
| 5 | G |
Now play the same pattern four different ways: first in straight quavers, then in a long-short rhythm, then in a short-long rhythm, and finally with an accent every third note.
Nothing about the notes changes, but your brain stays switched on because it has to listen for the new shape each time.
If this already feels unstable, reduce the pattern to C–D–E and back. A shorter pattern is still useful if it keeps you relaxed and accurate.
A Chord Warm-up That Already Sounds Like Music
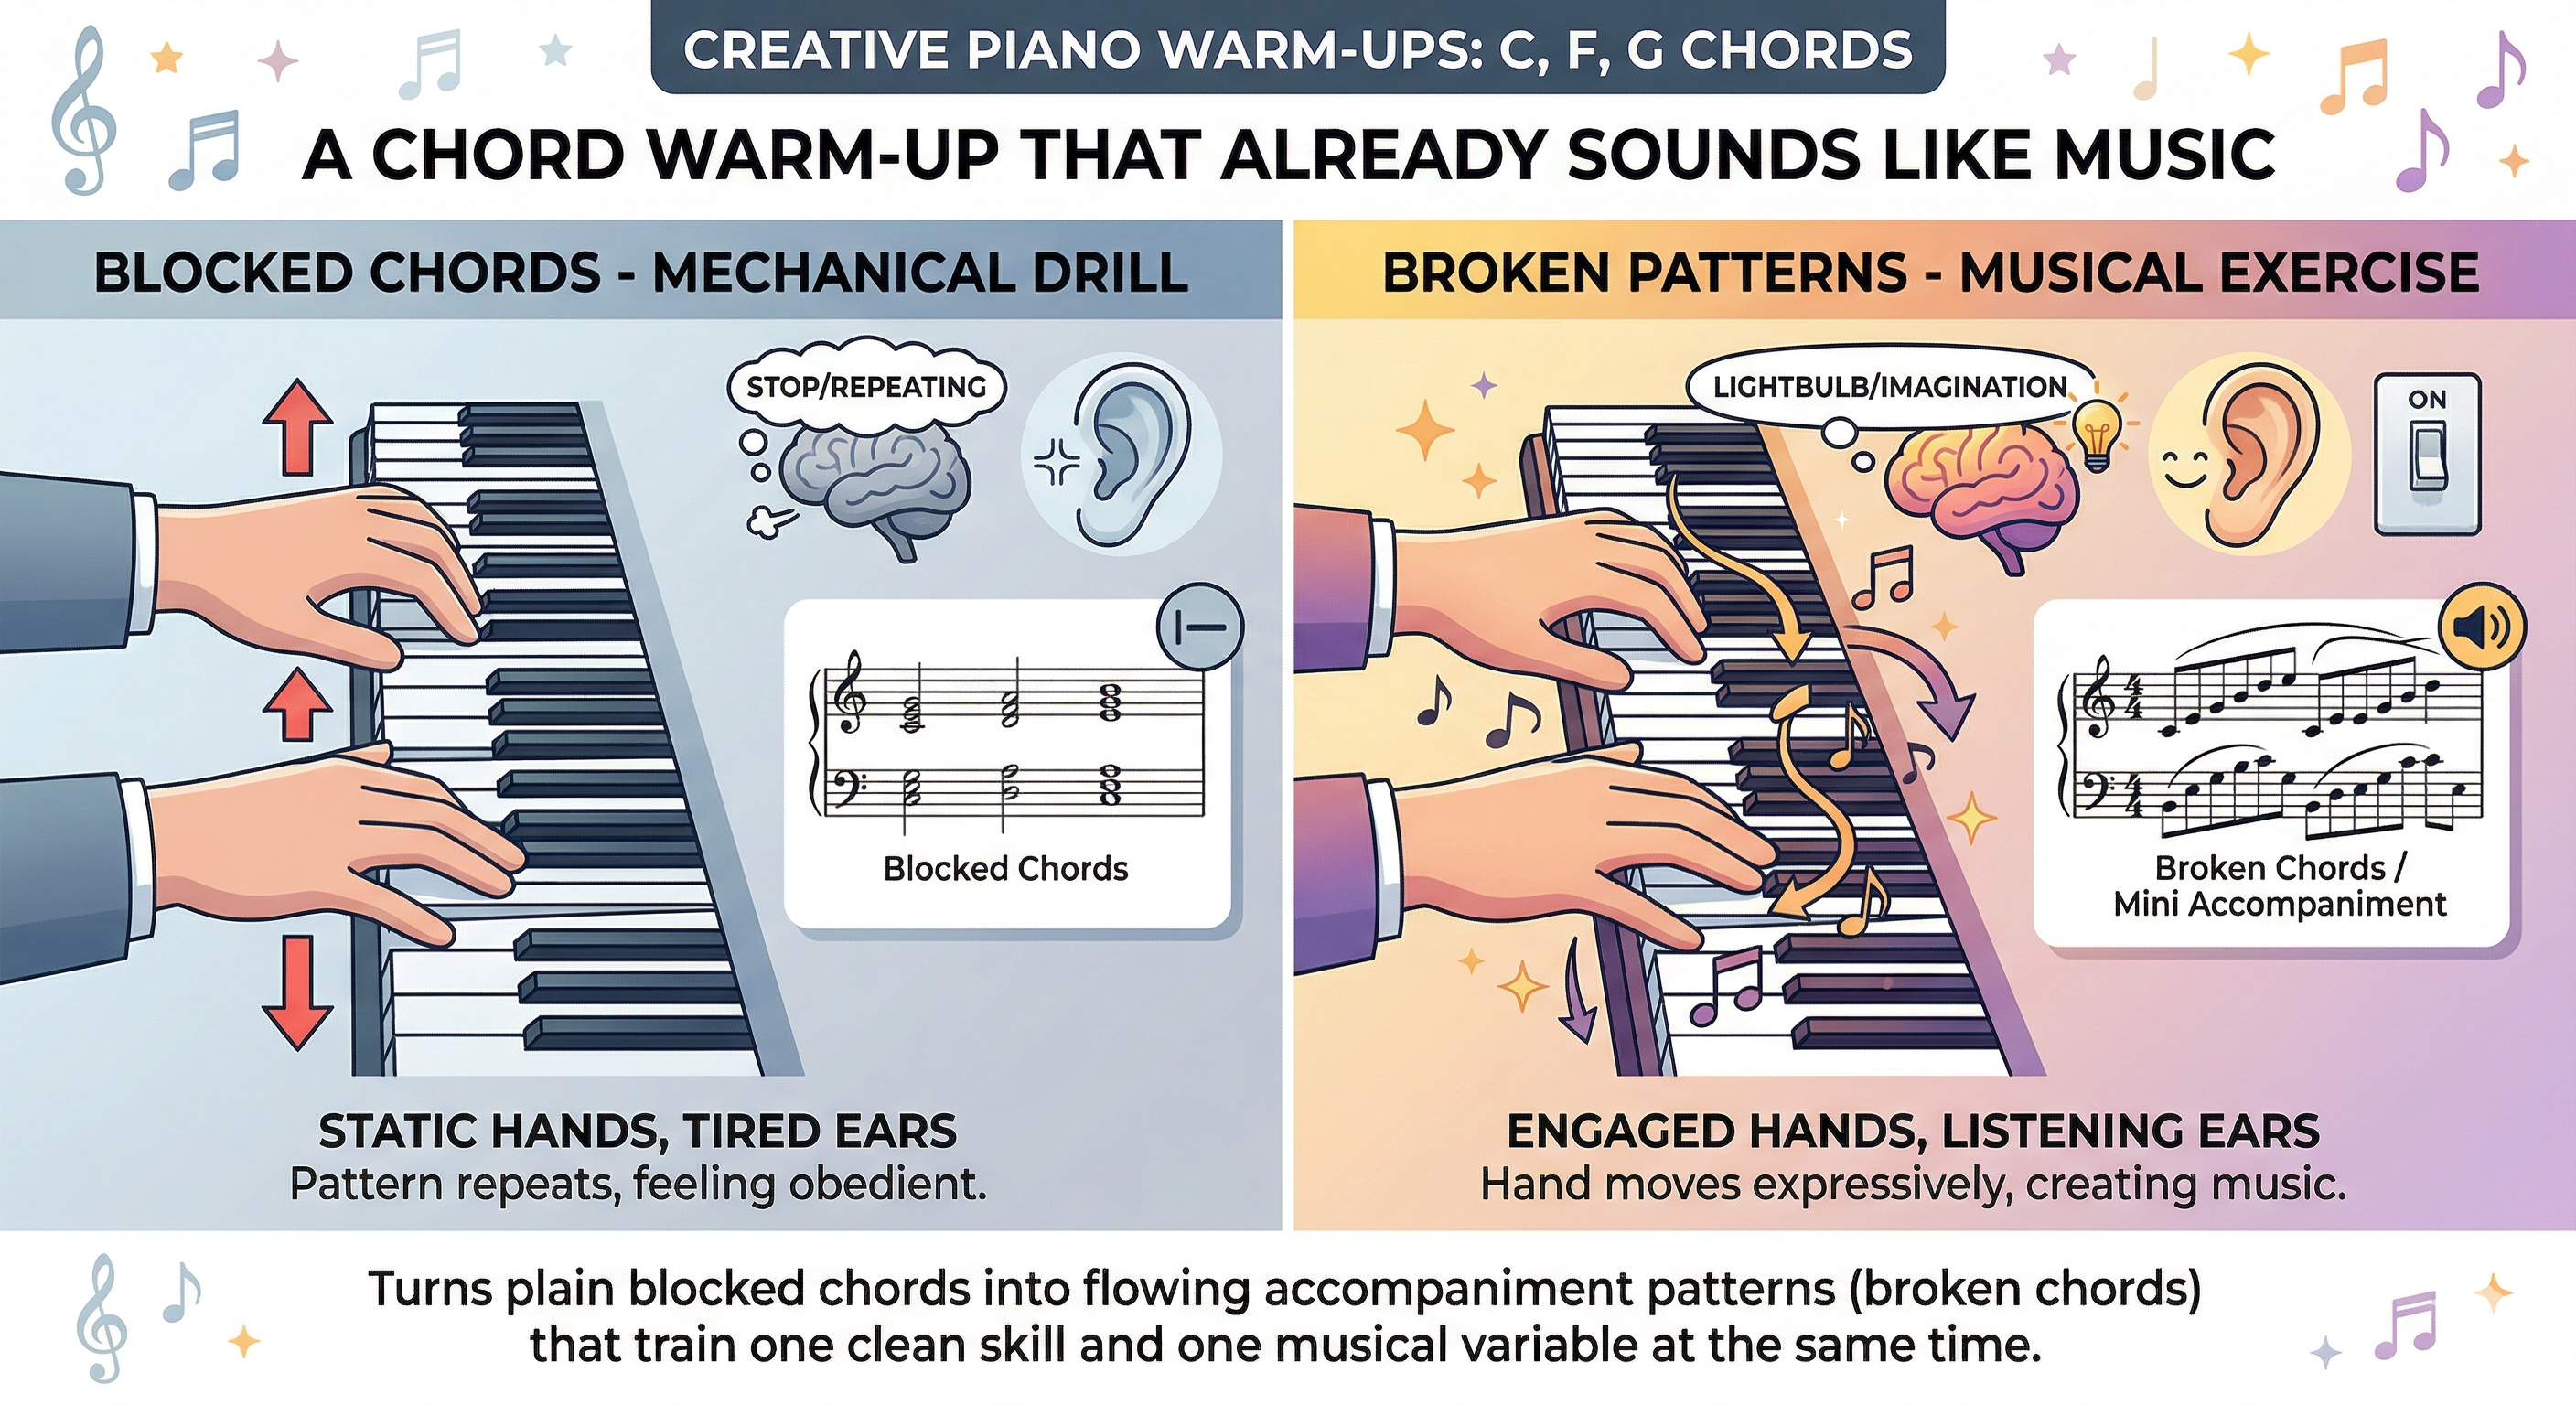
Choose three simple triads in one key, such as C, F, and G. First, play them as blocked chords. Then break them into simple patterns.
Then place the bass note in the left hand and the upper notes in the right. Then repeat them softly and again with a fuller tone.
This is still a warm-up, but it already resembles accompaniment instead of a sterile drill. That matters because your hands learn more easily when the sound suggests real music.
Optional Add-on: One Minute Of Sight-reading Or Active Listening
If you want one more minute, add four bars of very easy sight-reading or sing the top note of each chord before you play it. That tiny pause nudges you toward hearing first.
The idea connects with audiation, a term the Gordon Institute for Music Learninguses for giving music meaning internally before or while it sounds.
Away from the keyboard, you can reinforce the same habit by clapping a rhythm before playing it, silently visualizing the fingering of a short pattern, or listening to one phrase purely for articulation before you replay it.
A warm-up like this prepares the hand, but it also prepares the ear. That makes the next layer of work far more productive.
If you like to mark fingerings, accents, or quick ideas as you practice, it also helps to keep a pencil nearby that erases cleanly and stays readable on the page. A good roundup of pencils for musicianscan help if you want something better than a random school pencil.
Creative Piano Exercises For Finger Control And Evenness
This section is about cleaning up uneven fingers without drifting into lifeless repetition. The target is control you can actually hear.
Accent-shift Five-finger Patterns
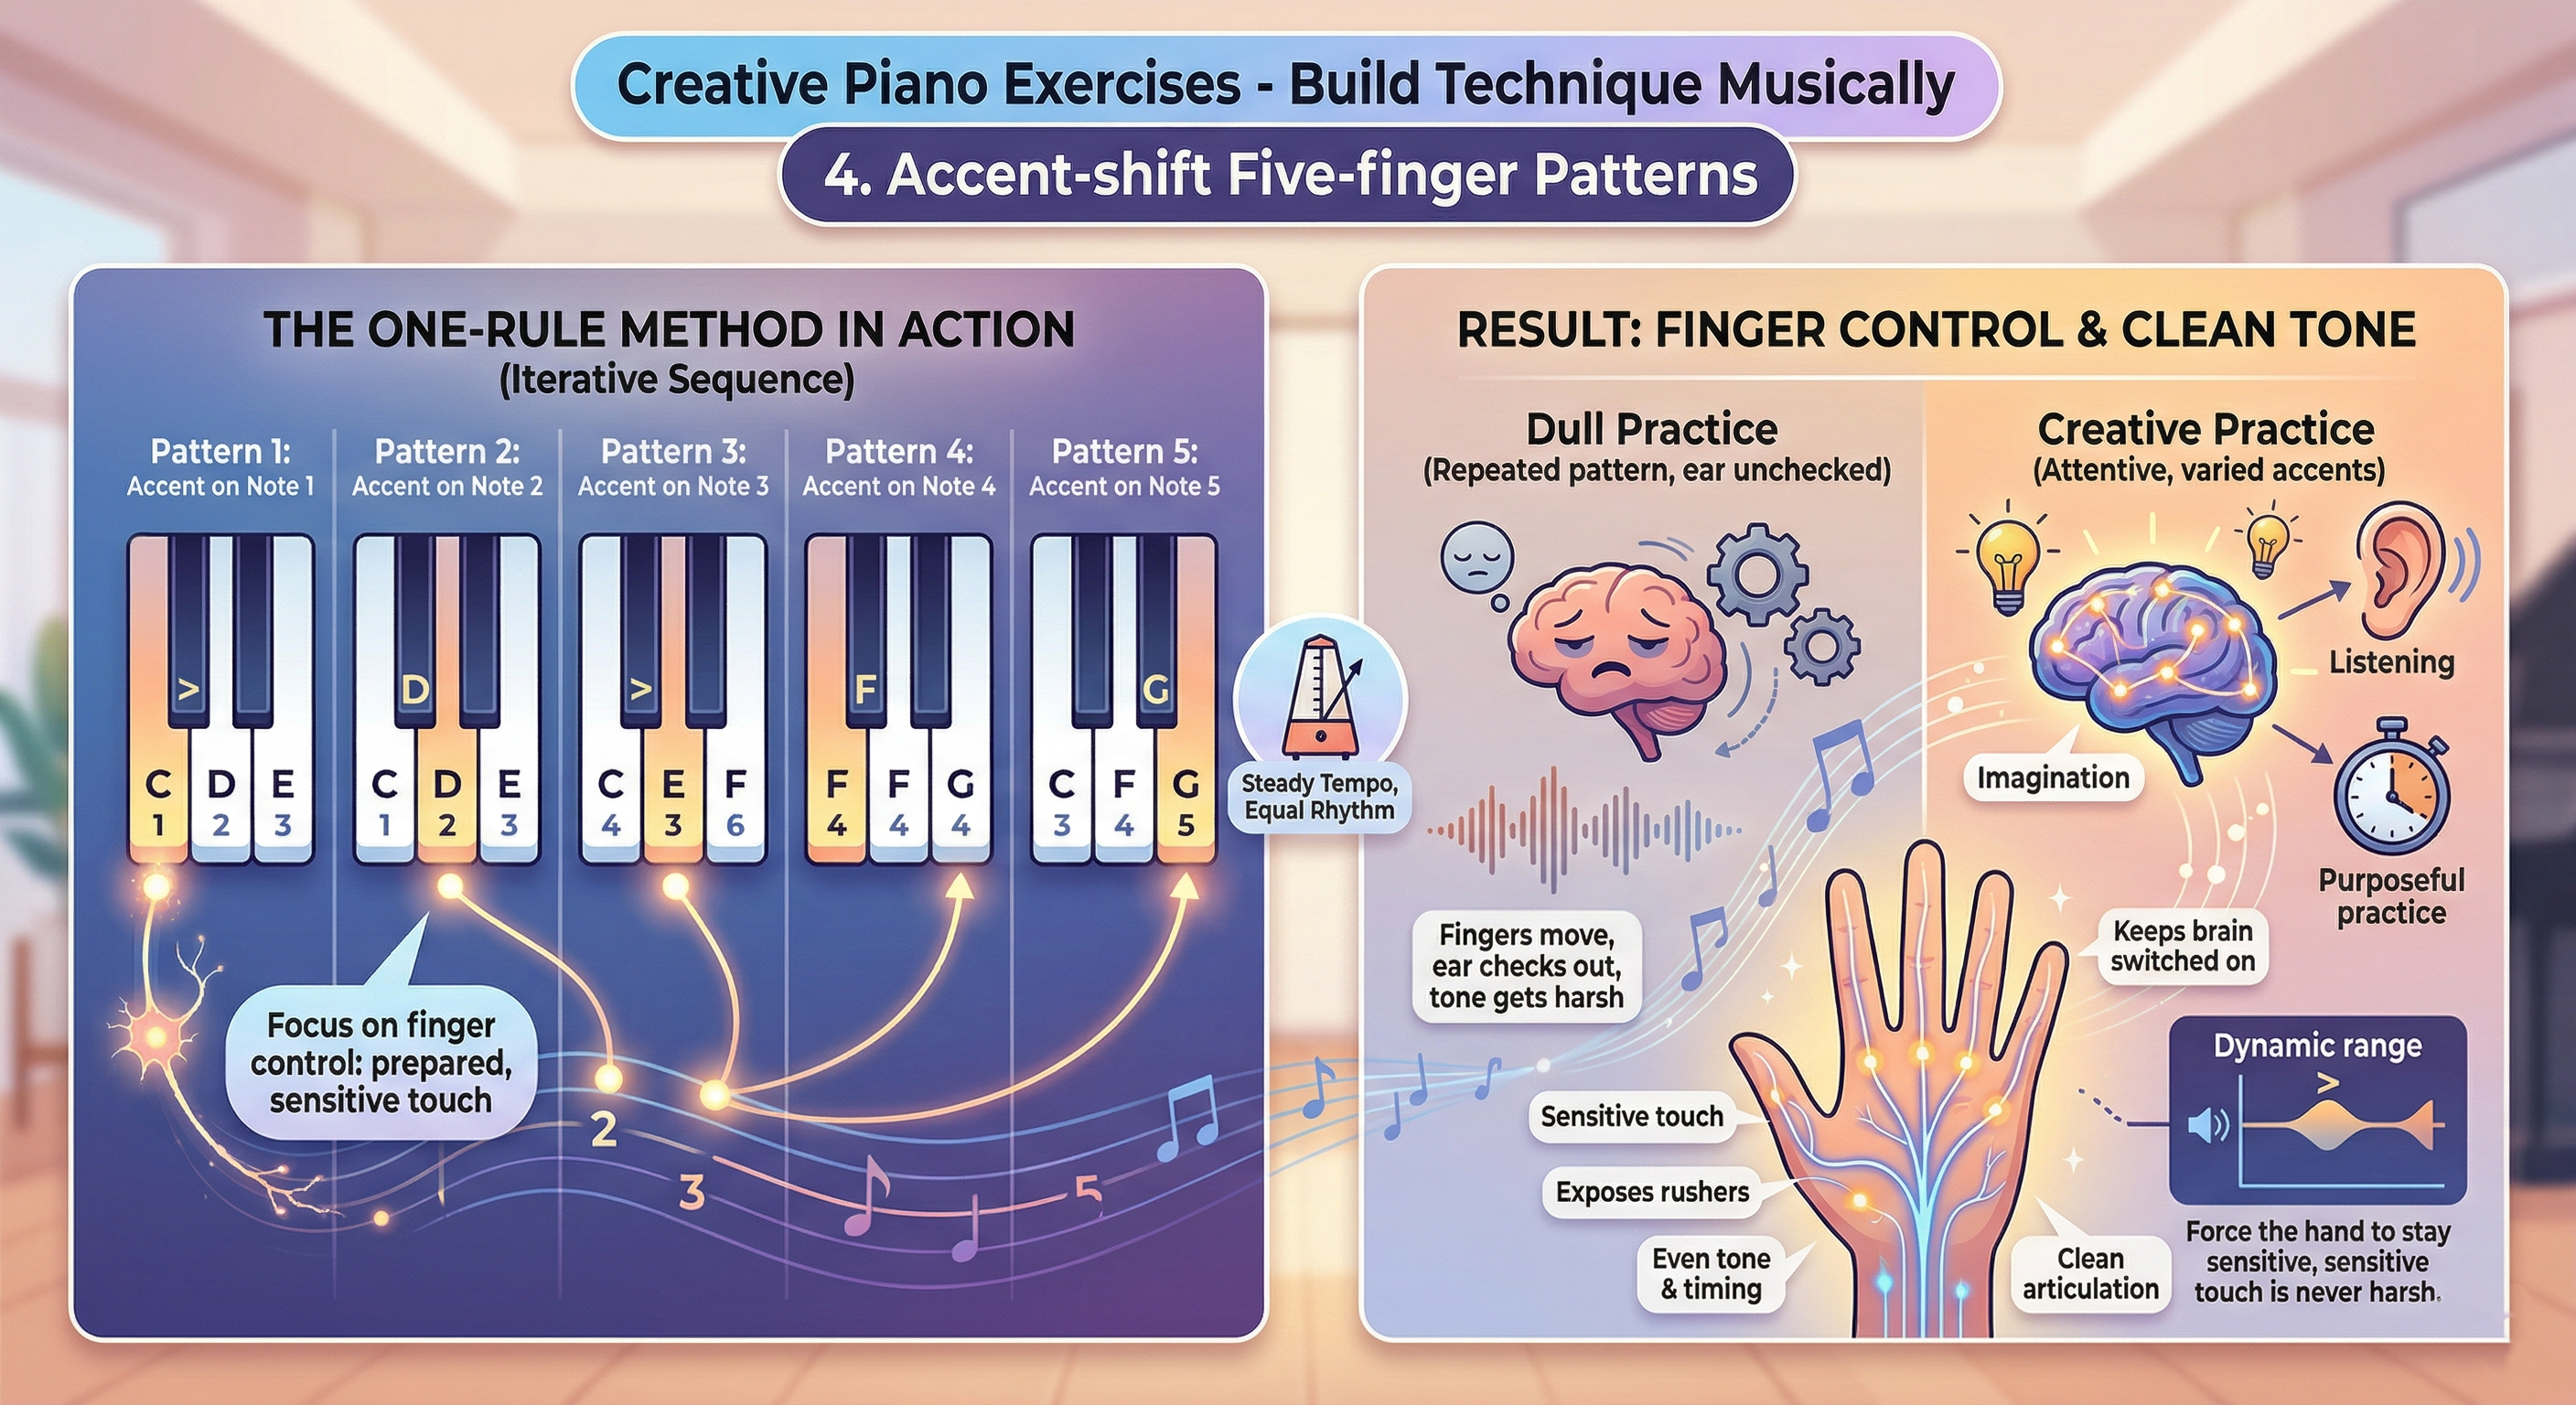
Play a five-finger pattern and move the accent from note to note. First accent note 1, then note 2, then note 3, and so on through note 5.
This exposes the fingers that rush, collapse, or disappear into the texture. It also teaches an important lesson: “same volume” is not the same thing as “same attention.” A finger often sounds weak because it was never truly prepared.
Dynamic Ladders For Control And Touch
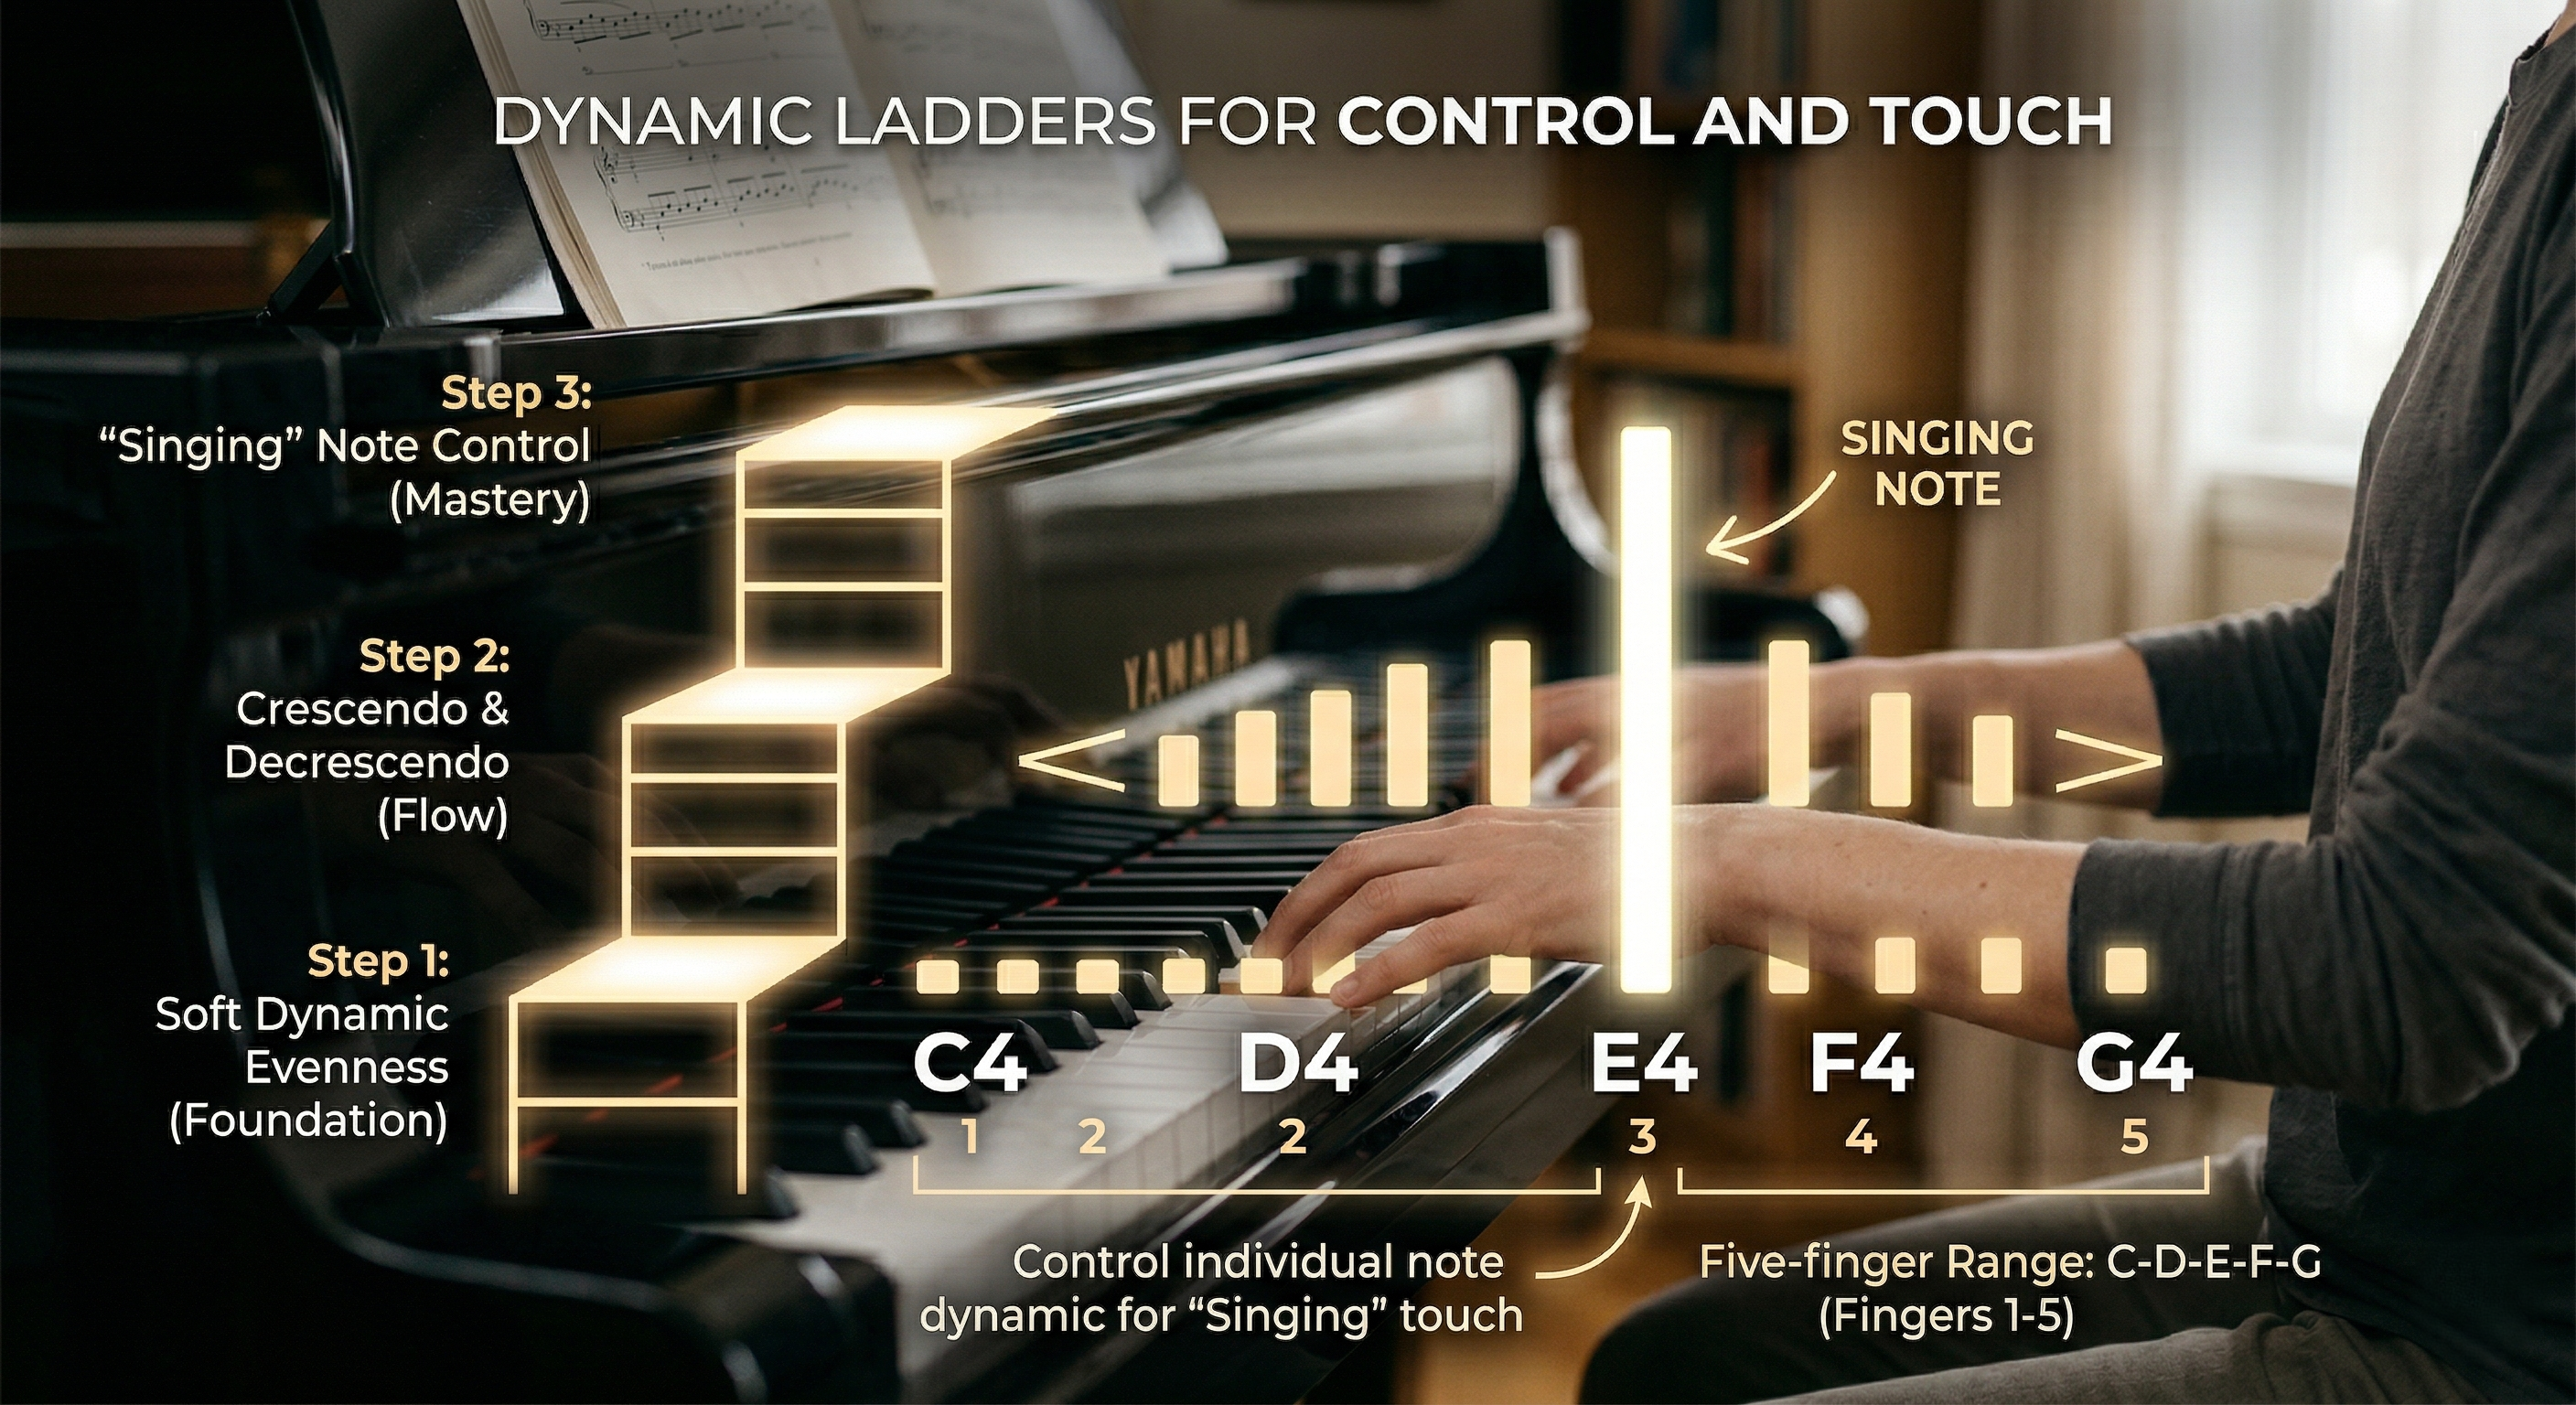
Use the same five notes, but shape them deliberately. Play up softly and back softly. Then crescendo on the way up and decrescendo on the way down. Then keep the passage at a middle dynamic but allow one note to sing slightly above the others.
A player who can control volume on purpose usually develops cleaner touch than one who only practices loud and fast. Dynamics force the hand to stay sensitive instead of percussive.
Articulation Swaps: Legato, Staccato, And Mixed Touch
Articulation changes are one of the quickest ways to make a simple exercise musically demanding. Try one pass fully legato, one fully detached, then one in which every second pair is slurred and the next pair is detached.
Even a basic pattern becomes intelligent work when the touch changes. The fingers have to organize the sound, not just the motion.
How To Level Each Exercise From Beginner To Intermediate
A beginner should stay with one hand, five notes, and a slow tempo long enough to hear evenness clearly.
An early intermediate player can bring the hands together with matching articulation. A more advanced player can widen the range, add dynamic shaping, or give each hand a different articulation.
If the exercise falls apart too quickly, simplify before you abandon it. Use one hand only, reduce the pattern to three notes, or keep the rhythm steady and remove dynamic changes first. A student usually does not need a harder pattern. They need a clearer job.
Once your fingers feel more even, the next bottleneck is usually coordination between the hands.
Creative Piano Exercises For Hand Independence
This is where many players freeze. One hand starts doing something different and the whole system crashes. The fix is to make the difference small, clear, and repeatable.
Split-rhythm Exercises That Feel Musical
Use one hand for steady crotchets and the other for two quavers per beat. Then reverse the roles.
A practical first version is this:let the left hand play a single C on beats 1, 2, 3, and 4 while the right hand plays C–D, E–F, G–F, E–D as quaver pairs.
Count the left hand as “1, 2, 3, 4” and the right hand as “1-and, 2-and, 3-and, 4-and.” Once that feels steady, switch the jobs.
The pattern is simple on purpose. It teaches separation without chaos.
Left-hand Pattern Plus Right-hand Melody
Let the left hand repeat a reliable pattern such as bass note plus chord, a broken fifth, or a bass note followed by two upper notes. Over that, the right hand plays a three-note or five-note melody.
This is one of the fastest ways to help a weak left hand feel useful. The left hand learns steadiness through repetition while the right hand stays expressive.
A Frontiers article on left-hand emphasis in piano practicesuggests that targeted left-hand attention can support piano learning and bimanual coordination, especially for right-handed players.
Contrary-motion And Call-and-response Drills
For contrary motion, start with both hands near the middle of the keyboard and move outward together, then inward together. For call-and-response, let the left hand play a tiny two-note idea and let the right hand answer it an octave higher.
Both versions help because each hand has a role. That is easier for the brain to track than “both hands together, but harder.”
The Most Common Coordination Mistake To Fix First
Most players do too much difference too early. They change notes, rhythms, articulations, and dynamics at once, then wonder why the hands panic.
Strip the task down until each hand can keep its role without stress. The point is not to make both hands equally busy.
It is to make each hand reliable. That becomes especially useful once you move into scales, chords, and harmony.
Creative Piano Exercises For Scales, Chords, And Harmony
You still need scales and chords. The problem is not that these tools are old. The problem is practicing them without musical purpose.
Scale Sequences That Improve Rhythm And Listening
Play a scale, but do not only go up and down. Group the notes in threes inside 4/4. Then group them in fours but accent every third note.
Then go up one octave legato and come down detached. Then pause briefly on scale degree 3 or 5 and listen to how it leans back toward the key center.
That keeps the fingering honest while teaching you to hear shape and tension. A scale should not feel like a punishment for wanting technique.
Chord Inversions As Mini Accompaniment Patterns
Take a simple progression such as I–V–vi–IV, or even just I–IV–V. Play each chord in root position, then in close inversions, then as broken patterns.
A quick example in C major would be C major as C–E–G, G major as B–D–G, and A minor as C–E–A. The goal is not theoretical complexity. The goal is to feel how inversion choice reduces jumping and makes accompaniment smoother.
ABRSM’s jazz piano framework treats scales, arpeggios, aural skill, and improvisation as connected rather than separate silos. That is the same mindset this article is built on.
Arpeggios With Phrasing And Dynamic Shape
A dry arpeggio says, “I am surviving.” A shaped arpeggio says, “I am making a line.”
Try one arpeggio with a small crescendo upward and a released return. Then let the top note sing slightly. Then phrase the pattern across two bars instead of one.
The notes stay the same, but the hand learns to arrive somewhere instead of merely passing through.
How To Turn One Key Into Several Musical Variations
If you spend ten minutes in C major, you can still make the session rich. Start with the scale in two rhythms. Move to tonic and dominant broken chords.
Turn I–IV–V into a simple accompaniment pattern. End with a one-bar improvisation that resolves to C. Then repeat the same material with a different mood.
That is enough structure to build skill and enough freedom to keep listening. From there, it makes sense to let the ear lead even more.
Creative Piano Exercises For Ear Training And Improvisation
This is the point where practice starts sounding alive. Improvisation is not a talent test. It is a structured way to hear, choose, and respond.
One-chord Improvisation For Beginners
Hold a simple left-hand C drone or C chord. In the right hand, improvise using only C, D, E, G, and A.
That limit is helpful.ABRSM’s improvisation guidanceemphasizes experimentation, and NAfME’s principles for improvisationstress freedom with structure and making music by ear. A beginner does not need more options. A beginner needs options that are easy to hear.
Limitation Games: 3 Notes, 1 Rhythm, 1 Mood
A nervous player often assumes freedom means infinite choice. It usually means the opposite: a few clear choices made well.
Try a one-minute improvisation using only three notes. Then keep the notes but use just one rhythm. Then keep the rhythm and aim for a single mood such as calm, playful, dark, or bright.
Then end every phrase on the same note and notice how repetition begins to create identity.
That is how random noodling turns into deliberate music-making.
Call-and-response By Ear
Play a tiny phrase. Stop. Answer it with a variation.
The source of the phrase can be a teacher, a recording, your own right hand, or your own left hand. The important part is that you hear something, hold it briefly in the ear, and answer it on purpose. That is one of the cleanest ways to connect listening to movement.
How To Improvise Without Sounding Random
Use a simple order. Pick a key or a chord. Limit the note set. Choose one rhythm pattern. Repeat something on purpose. Then change one thing only.
That last rule matters most. Repetition gives the ear something to recognize. Variation gives it something to enjoy. Once that balance makes sense, you can choose exercises much more intelligently.
Choose The Right Exercise For Your Biggest Practice Problem
A long list of exercises is not automatically useful. What helps is matching the drill to the problem you actually have today.
2-column Table - “If This Is Your Problem, Start Here”
| Practice problem | Best creative exercise to start with |
| Notes are even in one hand but messy in the other | Accent-shift five-finger patterns |
| Left hand feels weak or forgettable | Left-hand pattern plus right-hand melody |
| Both hands collapse when rhythms differ | Split-rhythm drill with one hand on crotchets |
| Scales feel automatic but not musical | Scale sequences with dynamic and accent changes |
| You get bored after two minutes | One technical target plus one new musical variable |
| Improvisation feels scary | One-chord improvisation with only 3–5 notes |
| You cannot hear what you want before playing | Sing top notes and use call-and-response |
| Practice feels unfocused | Use the 20–30 minute routine below |
What To Prioritize If You Only Have 10 Minutes
If time is tight, spend 2 minutes warming up, 3 minutes on finger control, 3 minutes on coordination, and 2 minutes on improvisation or active listening. That is enough to touch technique, timing, and creativity in one sitting.
Short practice does not need to feel shallow. It only needs to be selective.
What To Prioritize If You Keep Losing Motivation
Shorten the drill. Narrow the target. Make it sound better.
That advice is not sentimental. Monash research on piano practice motivationsuggests that engagement is shaped by emotion and motivation, not discipline alone. A player who leaves the piano feeling successful is more likely to return tomorrow.
The right exercise solves a real bottleneck and still feels worth repeating. That makes it much easier to build a complete routine.
A 20-to-30 Minute Creative Piano Practice Routine
The ideas only matter if they fit into a real session. This routine is structured enough to create progress and flexible enough to stay musical.
Beginner Version
Start with 5 minutes of musical warm-up, then spend 5 minutes on a five-finger pattern with rhythm and dynamic changes.
Follow that with 5 minutes of left-hand pattern plus right-hand melody, then 5 minutes of one-chord improvisation. If you have a little more time, use the final 5 minutes to apply the same idea inside a piece you are learning.
Adult Returner Version
Begin with 3 minutes of relaxed warm-up and tone check. Spend 6 minutes on a scale or chord pattern with one carefully chosen variation.
Then use 6 minutes on a coordination drill that resembles a real accompaniment pattern. Give yourself 5 minutes for call-and-response or short improvisation, and finish with 5 minutes of piece work using the same musical variable from the exercise.
Early Intermediate Version
Use 4 minutes for a warm-up with articulation contrasts. Then spend 6 minutes on scale sequences or inversion work, 6 minutes on split-rhythm or contrary-motion coordination, 6 minutes on limited improvisation with phrase shaping, and 5 minutes on repertoire transfer.
Worked Example - Turning One Simple Drill Into Four Musical Passes
Start with C–D–E–F–G in the right hand.
Pass 1 uses straight quavers and a smooth legato touch. Pass 2 keeps the notes the same but changes the rhythm to long-short.
Pass 3 keeps that rhythm and adds a crescendo on the way up with a relaxed release on the way down. Pass 4 adds a left-hand C chord under the pattern and lets the right hand shape the notes like a tiny melody.
Now compare the plain drill with the finished version. In the plain version, the hand only learns motion. In the richer version, the hand learns motion, balance, listening, and expression together.
This is also the point where exercises should start feeding real music. If your piece has a broken-chord left hand, use the same left-hand pattern in the same key for two minutes before you play the passage.
If your right hand sounds uneven in a scale-like phrase, run an accent-shift pattern in that same five-note area first. Exercises become more valuable when they solve a problem that already exists inside the repertoire.
There is a reason this balance works. Research on engagement and performance, including a Frontiers study on flow in piano performance, suggests that challenge matched to skill can support stronger involvement in the task. The next step is to avoid the mistakes that quietly ruin otherwise good practice.
Common Mistakes That Make Creative Exercises Stop Working
Creative exercises only help if they stay clear. This section keeps “more interesting” from becoming “less effective.”
Playing Too Fast Too Early
Speed hides problems before it solves them. If the sound gets uneven, harsh, or blurry, the tempo is already too ambitious.
Changing Too Many Variables At Once
Do not change rhythm, touch, dynamics, harmony, and register in the same first rep. Pick one. Let it settle. Then earn the next layer.
Ignoring Tone And Listening
A player can complete an exercise without ever really hearing it. That is how sloppy habits survive. If the ear is absent, the repetition usually teaches less than it seems to.
Using “creative” As An Excuse For Unfocused Noodling
Creativity still needs shape.NAfME’s improvisation principlesmake the case for freedom with structure, not freedom instead of structure. If you cannot explain what the exercise is training, it is probably too vague.
The best creative exercises are still disciplined. They simply sound more like music while the work is happening.
You Could Also Check out: 30 Easy Classical Piano Songs For Beginners
Frequently Asked Questions
What Are Creative Piano Exercises?
Creative piano exercises are short practice patterns that improve technique through musical variation such as rhythm, dynamics, harmony, ear training, or improvisation.
Are Creative Piano Exercises Good For Beginners?
Yes. They work especially well for beginners when the note set stays simple and the musical change stays small enough to control.
How Are Creative Exercises Different From Hanon-style Drills?
Hanon-style drills focus heavily on repeated mechanics. Creative exercises still train mechanics, but they also ask you to shape rhythm, touch, harmony, or expression.
Can Creative Piano Exercises Improve Hand Independence?
Yes. Split rhythms, left-hand ostinatos, and melody-plus-accompaniment drills teach each hand to keep a different role without collapsing into the other.
Do Creative Piano Exercises Help With Improvisation?
Yes. Improvisation becomes easier when you limit the notes, chord, rhythm, or phrase length instead of trying to invent everything at once.
How Long Should I Practice Piano Exercises Each Day?
For many learners, 10 to 20 focused minutes of exercises inside a 20 to 30 minute session is enough to make steady progress.
Should I Practice Scales Creatively Or Traditionally?
Both. Learn the fingering and shape cleanly first, then add rhythm, articulation, dynamics, or phrasing so the scale becomes musically useful.
What’s The Best Piano Warm-up Before Practicing Songs?
A strong warm-up includes relaxed posture, a five-finger pattern, one rhythm variation, and a chord pattern that already sounds musical.
What If Piano Exercises Feel Boring?
Change one variable before you quit: rhythm, articulation, dynamics, harmony, direction, or register. Boredom usually means the task is too repetitive, not too difficult.
Can Adults Use The Same Creative Piano Exercises As Kids?
Yes, though adults usually respond best when each exercise has a clear purpose and an obvious connection to songs, harmony, or musical expression.
Which Exercise Helps Weak Left Hand Most?
A repeating left-hand pattern under a simple right-hand melody is usually the fastest and most musical fix because it gives the left hand a steady job.
Do I Need Sheet Music For Creative Piano Exercises?
No. Many useful creative exercises need only five notes, one chord, or a basic counting pattern.
Can Creative Piano Exercises Improve Ear Training Too?
Yes. Singing scale degrees, echoing short phrases, and improvising with limited notes all strengthen the link between hearing and playing.
What Are Good Creative Piano Exercises For Intermediate Players?
Good options include sequence patterns, inversion drills, contrary motion, rhythmic displacement, accompaniment-plus-melody work, and phrase-shaped arpeggios.
Should Exercises Sound Good, Or Are They Just Technical?
They should sound musical enough to keep you engaged while still training one skill clearly. Technique improves faster when the ear stays involved.
How Do I Know Which Exercise To Choose First?
Start with your biggest bottleneck:uneven fingers, weak left hand, shaky rhythm, poor listening, or fear of improvising.
Can I Build A Whole Practice Routine From Creative Exercises?
Yes. A balanced routine can include warm-up, control work, coordination, harmony, improvisation, and repertoire transfer without needing a separate block of lifeless drills.
Conclusion
The best creative piano exercises do not remove discipline. They give discipline a sound, a shape, and a reason. That is why they hold attention better than endless mechanical repetition.
A pianist who practices musically is not taking an easier route. They are taking a smarter one. Keep one technical target clear, add one musical variable, and let each rep teach both the hand and the ear.
Also Read: Numbers In Music Explained For Beginners And Musicians