Happy Birthday Piano Chords And Easy Tutorial
You have never touched a piano before, and someone's birthday is coming up. You want to play "Happy Birthday" for them, but every tutorial you find either uses sheet musicyou cannot read or skips straight to the notes without explaining anything.
You will get the full melody in plain letter notes, a simple left-hand chord guide, a rhythm breakdown, and a practice plan you can follow today. No sheet music knowledge needed. No prior experience required.
The approach here mirrors exactly what a good piano teacher does in a first lesson: build one layer at a time until the whole song clicks. Start from the top, follow each step, and by the end, you will have a song you can actually play.
Key Takeaways
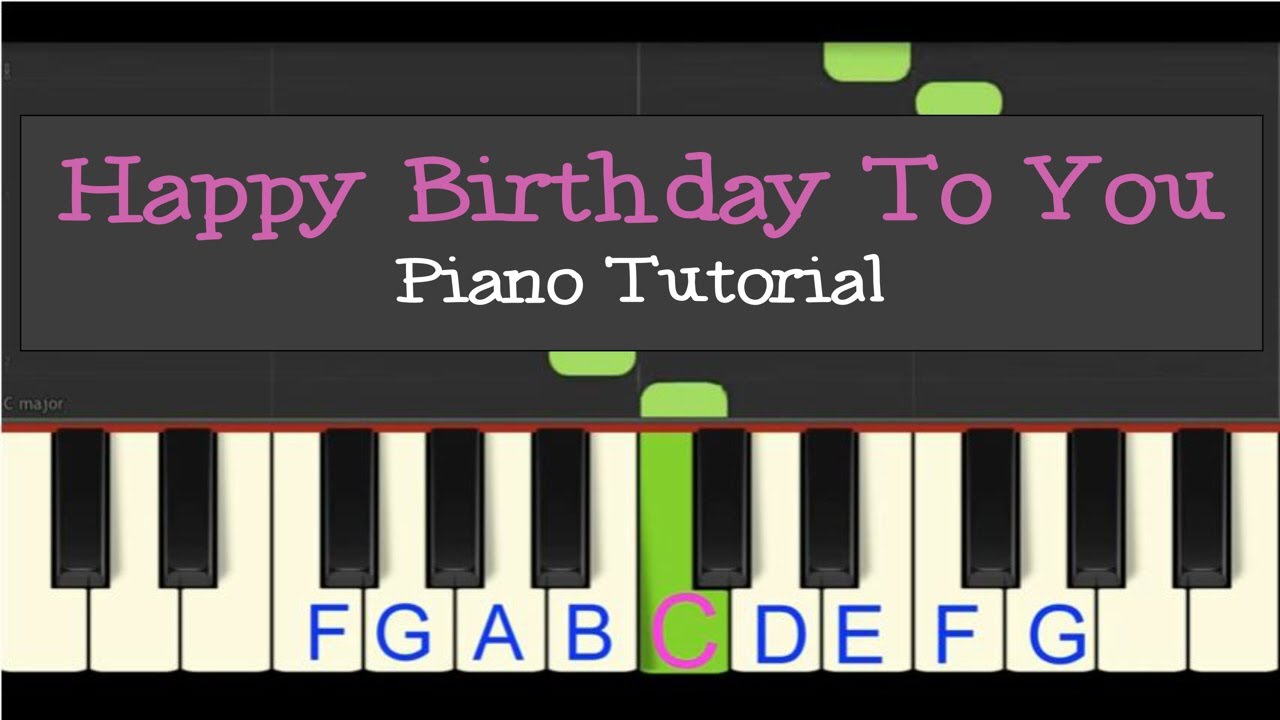
- Happy Birthday is played in C major, using only white keys
- The right hand plays the melody starting on G4(the G above middle C)
- The full note sequence is: G G A G C B / G G A G D C / G G G E C B A / F F E C D C
- The song is in 3/4 time, giving it that familiar waltz-like bounce
- Most beginners learn the right-hand melody in a single 20-30 minute session
Why Happy Birthday Is The Perfect First Song To Learn
Picking the right first song matters more than most beginners realize. While some people might search for a longevity estimatorto determine if they have enough time left to master an instrument, the truth is that music is accessible at any stage of life. If you choose something too hard, you quit. Choose something too easy, and it feels pointless. "Happy Birthday" sits in exactly the right spot.
It Only Uses 8 Notes In One Key
The entire song uses just eight different notes: C, D, E, F, G, A, B, and C again, one octave higher. Every single one of them sits in the C major scale, which means no sharps, no flats, and no confusing accidentals. For a beginner, that removes one of the biggest obstacles immediately.
Because the notes are limited and repeat in a predictable pattern, your fingers start to remember where to go without you having to think hard about it. That muscle memory builds faster than you expect.
No Black Keys Required
When played in C major, "Happy Birthday" is an entirely white-key song. Every note you need is a natural white key, which means you never have to hunt for a black key in the middle of a phrase.
This keeps your focus where it belongs in the early stages: on the melody and the rhythm, not on navigating the keyboard. This is not a minor convenience. For absolute beginners, eliminating black key navigation cuts confusion in half.
How To Read Piano Notes By Letter (Before You Play A Single Key)
Before placing your hands on the keyboard, spend two minutes understanding how notes are named. You do not need to read sheet music for this. You only need to know three simple things.
The Note Names: A B C D E F G
Piano keysare named using only the letters A, B, C, D, E, F, and G. After G, the sequence starts over again at A. Each complete set of A through G is called an octave. The white keys follow this pattern across the keyboard, repeating from left (low notes) to right (high notes). That is the entire alphabet of piano notes. Seven letters, repeating. Nothing more.
Understanding Octave Numbers (C4, G4, Etc.)
Because the same letter appears multiple times on the keyboard, a number is added to specify which one. C4means the fourth C on the keyboard, also known as middle C. G4means the G in the same octave, just five white keys to the right of middle C.
For this song, you will mostly work in the C4-C5 range, which is the area right in the middle of any standard keyboard. This is where the bulk of beginner piano happens.
How Finger Numbering Works
Both hands use the same numbering system:
- 1= Thumb
- 2= Index finger
- 3= Middle finger
- 4= Ring finger
- 5= Pinky
When you see a note written as G4 (4), that means play G4 with your ring finger. This numbering makes finger placement simple and consistent, and it is the same system used in every piano method book worldwide.
Read Also: How To Make Piano Learning Easier And More Enjoyable
Finding Your Starting Position On The Keyboard
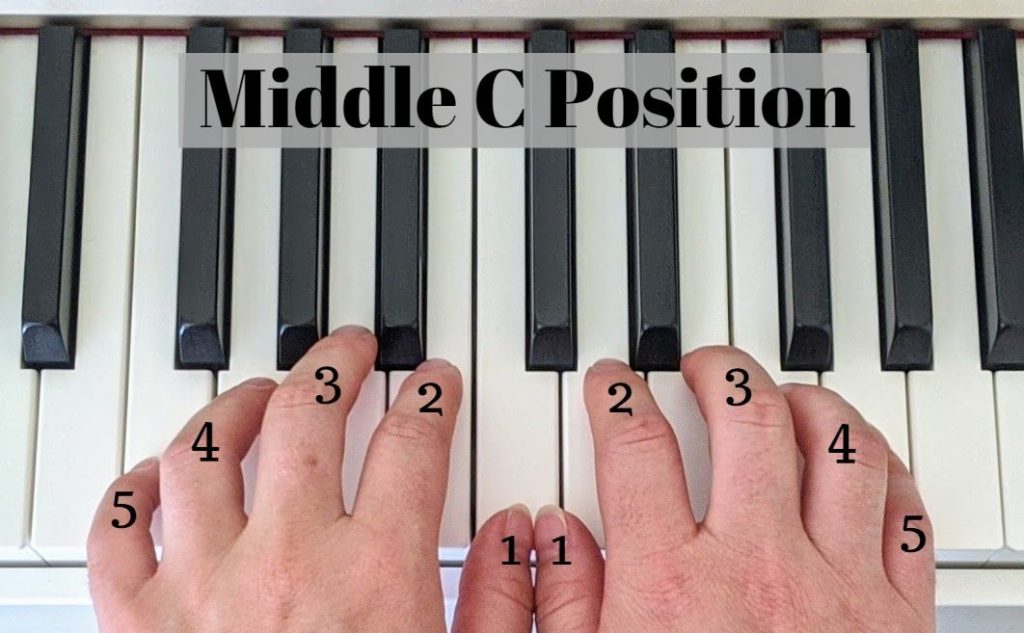
Knowing where to put your hands before the first note is half the battle. Get this right once, and you never have to think about it again.
Locating Middle C
Middle C is the single most important landmark on any keyboard. Here is how to find it every time:
- Look for a group of two black keysanywhere on the keyboard
- The white key immediately to the leftof those two black keys is a C
- Find this same pattern near the centerof your keyboard
- That center C is middle C, also called C4
On a standard 88-key piano, middle C is key number 40 from the left. On a 61-key keyboard, it is roughly in the middle of the instrument.
Where To Place Your Right Hand For Happy Birthday
Once you have found middle C, move your right hand slightly to the right:
- Place your thumb (finger 1)on C4(middle C)
- Your ring finger (finger 4)naturally falls on G4
- That G4 is your starting note for "Happy Birthday."
You will notice that this one-handed position covers almost the entire melody without major repositioning. That is intentional. The song was designed in a range that fits a relaxed, open hand shape.
See Also: Creative Piano Exercises
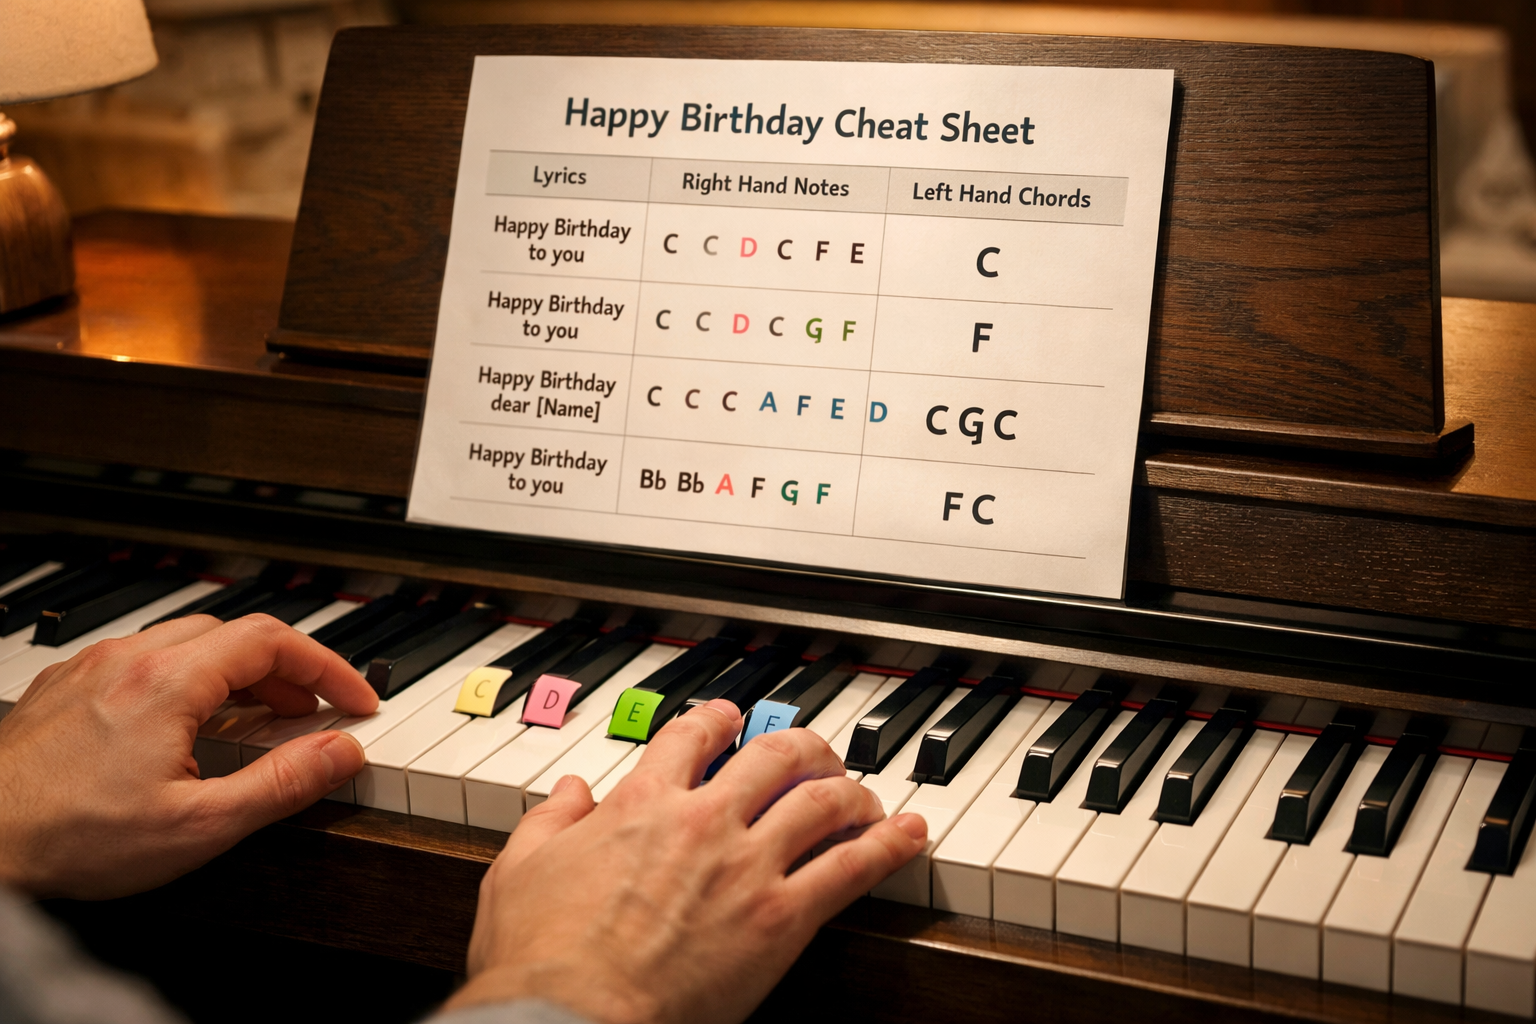
The Complete Right-Hand Melody Notes For Happy Birthday

Easy Happy Birthday Keyboard and Piano Tutorial (Right Hand)
This is the core section you came for. The full melody is broken into four lines below, exactly matching the four phrases of the song as you would sing them. Each note is written as a letter, and the finger number appears in parentheses.
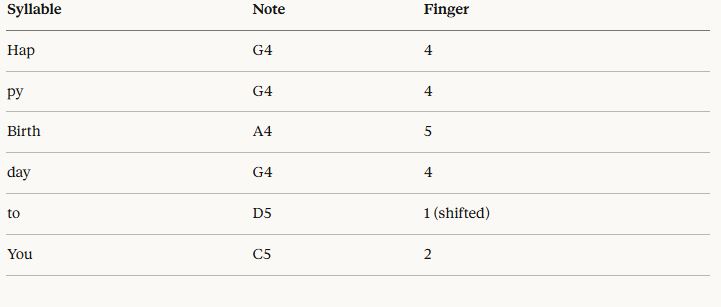
Line 1 And Line 2 - The Verse
- Line 1:"Hap-py Birth-day to You"
- Line 2:"Hap-py Birth-day to You"
| Syllable/Note | Finger |
| Hap/G4 | 4 |
| Py/G4 | 4 |
| Birth/A4 | 5 |
| Day/G4 | 4 |
| To/G5 | 1(shifted up) |
| You/B4 | 2 |
(Line 2 repeats identically but ends on D5 instead of C5 on "to")
Line 2 variation - "to You":
Line 3 And Line 4 - The Chorus
Line 3:"Hap-py Birth-day Dear [Name]"
Line 4:"Hap-py Birth-day to You"
- Hap - G4 (Finger 4)
- py - G4 (Finger 4)
- Birth - G5 (Finger 5 - shift up)
- day - E5 (Finger 3)
- Dear - C5 (Finger 1)
- [Name] - B4 (Finger 2) ... A4
- Hap - F5 (Finger 4)
- py - F5 (Finger 4)
- Birth - E5 (Finger 3)
- day - C5 (Finger 1)
- to - D5 (Finger 2)
- You - C5 (Finger 1)
Note on Technique: The "shift up" instruction for the third syllable requires moving your hand position to reach the higher octave G5 while maintaining the remaining sequence for the E5 and C5 transitions.
Full Note Sequence At A Glance
For quick reference, here is the complete melody in letter form:
Read it from top to bottom, left to right, one note per syllable of the song. Sing along as you play, and the timing will come naturally.
G G A G C BG G A G D CG G G E C B AF F E C D C
Understanding The Rhythm: How Happy Birthday Feels
Knowing the notes is only part of playing the song correctly. The rhythm is what makes it recognizable. Without it, "Happy Birthday" sounds like a disconnected list of sounds.
What 3/4 Time Means For Beginners
"Happy Birthday" is written in 3/4 time, which means each measure contains three beats. You count: 1 - 2 - 3, 1 - 2 - 3in a steady loop. This is the same rhythm used in waltz music, and it gives the song that gentle bounce you already recognize.
The first note of the song ("Hap" on G4) is actually a pickup beat, meaning it arrives just before beat 1 of the first full measure. Do not worry about counting this perfectly at first. Just think of it as a short lead-in note before the main phrase begins.
Which Notes Are Long And Which Are Short
Not every note gets the same amount of time. Here is a simple guide:
- Short notes (1 beat):"Hap," "py," "Birth," "to" - these move quickly
- Longer notes (2 beats):"day," "You," "Dear" - hold these a little longer
- The final "You":Hold this one for 3 beats; it is the longest note in the song
A practical trick: sing the words as you play. Your voice naturally holds "You" longer than "Hap," and your fingers will follow. Singing along is one of the fastest ways to internalize the rhythm without counting out loud.
Left Hand Basics: Simple Chords To Accompany The Melody
Even simple left-hand chordsmake the song sound complete instead of bare and thin. You only need three chords.
The Three Chords You Need
Play each chord with your left hand, pressing all three notes at the same time:
- C major (C chord):C3 + E3 + G3 - fingers 5, 3, 1
- G major (G chord):G3 + B3 + D4 - fingers 5, 3, 1
- F major (F chord):F3 + A3 + C4 - fingers 5, 3, 1
Find these chords by placing your left pinky on the root note (C, G, or F) and letting your middle finger and thumb fall naturally on the next two white keys in the chord shape. These three chord shapes are identical in finger spacing once you know where to start.
When To Switch Chords
The chord changes align with the phrases of the song:
- Lines 1 and 2 (first two "Happy Birthday to You"):Start on C, switch to G on "to You," back to C
- Line 3 ("Happy Birthday Dear [Name]"):Use F on "Birthday," back to C
- Line 4 (final "Happy Birthday to You"):C to G to C
Do not try to play the left hand and right hand together in your first session. Learn the chord sequence separately until your left hand moves without hesitation.
How To Practice Happy Birthday Step By Step
Easy Piano Tutorial: Happy Birthday to You! (slow tempo)
A great practice plan turns a confusing jumble of notes into a real, playable song faster than any shortcut. Here is the exact four-step method used in beginner piano lessons.
Step 1 - Right Hand Alone, Very Slowly
Sit at your keyboard and find your starting position (ring finger on G4). Play through the note sequence one note at a time, as slowly as you need to. The goal here is accuracy, not speed.
Say the note name out loud as you press each key. "G... G... A... G... C... B..." This double input (hearing yourself + feeling the key) builds note memory faster than silent practice alone.
Step 2 - Add The Rhythm
Once you can play through all four lines without stopping to search for notes, add the rhythm. Sing the words as you play, letting the syllables guide how long each note lasts.
Use a metronome app set to 60-70 BPMif you have one. Even free smartphone metronome apps work perfectly. Play at a tempo that feels relaxed and comfortable. Speed comes later.
Step 3 - Introduce The Left Hand
With your right hand resting, practice the three chords with your left hand in the order they appear in the song: C, G, C, F, C, G, C. Play each chord cleanly and hold it for a full beat before switching.
Repeat this chord sequence until the transitions feel smooth and automatic. This usually takes 5-10 minutes of focused repetition.
Step 4 - Putting Both Hands Together
Combine both hands, one phrase at a time. Start with just Line 1, playing the right-hand melody over the left-hand chords. When Line 1 sounds clean, add Line 2. Work through the song one phrase at a time until you can play it all the way through.
Expect the first combined attempt to feel awkward. That is normal. The goal is not perfection in one session but steady, deliberate improvement across short practice blocks.
Common Beginner Mistakes (And How To Fix Them)
The same handful of mistakes appear in nearly every first lesson. Knowing them in advance saves you a lot of frustration.
Playing too fast, too soon:Speed is the enemy of learning. When beginners rush, wrong notes get locked into muscle memory. Always learn at a pace where every note is correct, even if it feels painfully slow.
Skipping the rhythm stage:Playing all the right notes in the wrong timing makes the song unrecognizable. Spend deliberate time on rhythm before worrying about speed or the left hand.
Trying to combine both hands before each hand is solid alone:This is the most common mistake. If the right hand stumbles without the left, adding the left hand only doubles the confusion. Make sure each hand is smooth on its own before combining.
Tensing up the wrist or fingers:A tight hand produces stiff, uneven playing. Keep your wrist slightly relaxed and your fingers gently curved, as if you are holding a small ball. Check your tension every few minutes during practice.
Not using a consistent fingering:Changing which finger you use for the same note in different run-throughs creates inconsistency. Pick one fingering pattern and stick to it every single time.
Frequently Asked Questions
What Are The Piano Notes For Happy Birthday?
The notes in C major are: G G A G C B / G G A G D C / G G G E C B A / F F E C D C. Each note group matches one sung phrase of the song.
What Key Is Best For Beginners?
C major is the best starting key. It uses only white keys, so there are no black keys to navigate and no sharps or flats to remember.
Which Hand Plays The Melody?
The right hand plays the melody. The left hand plays chord accompaniment using C major, G major, and F major chords.
Does Happy Birthday Use Black Keys?
No. When played in C major, every note in the song is a white key. This is one of the main reasons it is recommended for beginners.
How Long Does It Take To Learn?
Most beginners learn the right-hand melody in one 20-30 minute session. Adding the left hand and playing both together typically takes one to two more short practice sessions.
What Does 3/4 Time Mean?
3/4 time means each measure has three beats. Happy Birthday has a waltz-like feel because of this rhythm. Count "1-2-3, 1-2-3" as you play.
Where Do I Place My Right Hand To Start?
Place your ring finger (finger 4) on G4, which is the G just above middle C. Your thumb will sit naturally on C4.
Can I Learn This On A Keyboard Instead Of A Piano?
Yes. Any keyboard with at least 5 octaves works well for this song. The notes and fingering are identical whether you are on a digital keyboard or an acoustic piano.
Final Thoughts
"Happy Birthday" earns its place as the go-to first song for beginners for a simple reason: it is forgiving, familiar, and genuinely rewarding to play. By the time you finish working through these steps, you will not just have memorized a handful of notes.
You will understand how to find notes on a keyboard, how rhythm shapes a melody, and how two hands working together change the whole sound of a piece. That is a real foundation, not just a party trick.
The best next step is to sit down with this guide open and work through each stage in order. Do not skip ahead. Ten minutes of slow, deliberate practice beats an hour of frustrated rushing. Play it well once, even slowly, and the rest will come faster than you expect.